

Every month's challenge has a theme and the theme for this month's is "Icing on the Cake" and happens to be sponsored by the D. Lawless Hardware, so the prize packages will be from them . They were generous enough to offer a first and second prize! Here's to hoping! (Disclosure: This is a sponsored post and I did receive product from them for this project)

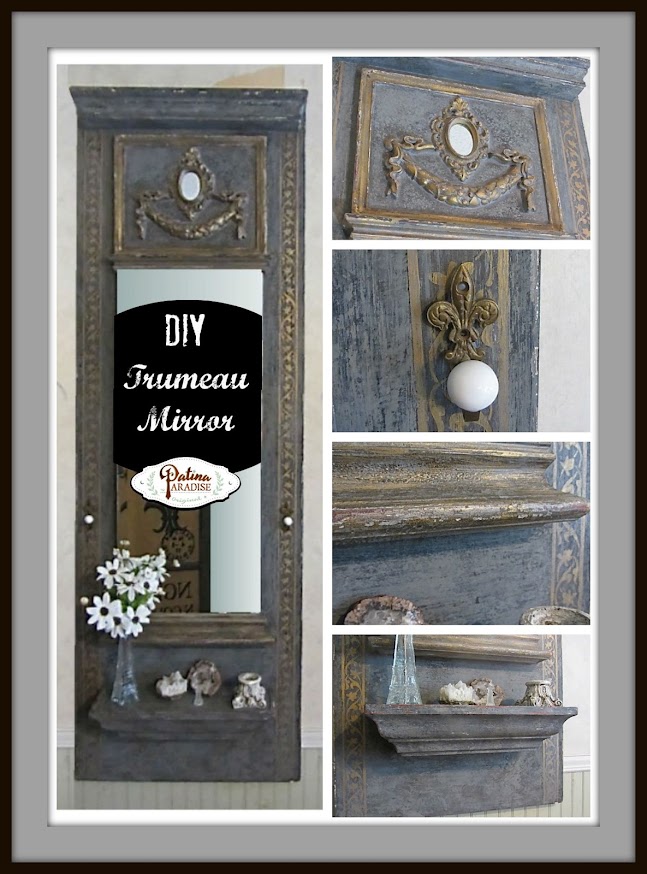
As I browsed their online catalogue and saw that besides some wonderful hardware, they also had some wood appliqués, I fell in love. I then knew what I was going to do for the challenge… to finally make a trumeau mirror. I just needed to gather and put all of the pieces together.

I chose this hand carved 12" wood swag w/ribbons, leaves and berries. If I win the challenge, I will definitely be picking out more wood appliqués! They are just gorgeous!

The frame was already in my stash and it was just the right width for above the mirror. A thin piece of wood was cut to replace the glass. The swag was a little lost in the frame so I added the little mirror above it to embellish it even further and I think they work beautifully together.
This is the dresser mirror that I started out with. When I first saw the set of 3 a few months ago at the thrift store, I knew they would be great for making Trumeau Mirrors. Now I had to figure out what I was going to use to mount the mirror and swag onto. The plan was to use a table leaf as the background base, but when I finally bought it (I waited a few weeks for it to go on sale at the thrift store), it was not long enough to incorporate the swag and a few other items that I wanted. So on to plan B. While at Lowes one day, I found a piece of wood that seemed wide and long enough to do the job.


It was 24" x 72", which seemed too long at first, but then ended up being just right.
Anatomy of my Trumeau Mirror

Since I was limited by the tools that we have or rather do not have, I tried to use items that were ready made and didn't require cutting or constructing. The frame was just the right width to go above the mirror. And the shelf on the top (not seen in this photo, added after it was taken), and the shelf on the bottom were both the perfect widths. My husband secured all the pieces with screws from behind.
Now it was time to decide what paint I was going to use. And since I had the option of using any type, I decided to attempt to replicate an authentic antique French Trumeau. I knew that the techniques learned from the Farragoz class would do the trick to give me the "Old World" patina look that I love.

I put on 3 layers of homemade gesso and then one layer of light grey and one layer of dark grey homemade milk paint. It was thicker than normal and when I brushed it on, it really reminded me of icing a cake. Here it is with the last coat of dark grey paint.

Since it was already really heavy and I couldn't find any moulding that I felt would compliment it, and to save money, I decided to paint a border along the edges. I searched Pinterest and found a page from an old architectural ornaments book and replicated it with my Silhouette Designer program, mirroring it for each side.

After printing it out from the computer, I transferred it with copy paper down the sides. And then began painting it in gold. I also painted the frame around the swag and mirror in gold touches.


To see all of the entries in the Fab Furniture Flippin' Contest head on over to Dandelion Patina or Evey's Creations.
If you are a blogger who paints furniture and would like to take part in the Fab Furniture Flippin' Contest you can contact Stacy from Anastasia Vintage at info@anastasiavintage.com or Evey from Evey's Creations at info@eveyscreations.com.
Hope I have inspired you to get your creativity on!
Blessings,
Lucy
UPDATE… MY MIRROR WON!!!

And a Huge Thank You to D. Lawless for Sponsoring this month's contest and for choosing my project. I look forward to picking out my selection of their hardware and wood appliqués for future projects as my winnings!
Partying at these locations...
Before and After Linkup @ Thrifty Decor ChickFriday Favorites @ Remodelaholic
Swing into Spring @ DIY by Design
Upcycled Link Party @ Funky Junk Interiors
Share it One More Time @ One More Time Events
DIY Sunday Showcase @ The Interior Frugalista
Saturday Sparks @ Pieced Pastimes
Silver Pernnies Sundays @ Finding Silver Pennies
Amaze Me Mondays @ Dwellings
That DIY party @ diy showoff
What's It Wednesday @ Ivy and Elephants
Home and Garden Thursday @ A Delightsome Life
Simple and Sweet Fridays @ Rooted in Thyme
Treasure Hunt Thursday @ From My Front Porch to Yours
Share Your Cup Thursday @ Have a Daily Cup of Mrs. Olson
Your Turn to Shine @ Bless'er House
Think and Make Thursdays @ Little Red Brick House
Creative Spark @ Two Purple Couches
The Creative Circle @ Up to Date Interiors
Feathered Nest Fridays @ French Country Cottage
The Inspiration Gallery @ craftberry bush
Creativity Unleashed @ Practically Functional
Shabbilicous Fridays @ The Shabby Art Boutique
Inspiration Friday @ The Painted Drawer
Frugal Friday @ The Shabby Nest
A morning Cup of Joe @ The Cottage Market
Something to Talk About @ Spain Hill Farm
Inspire Me Monday @ Sand and Sisal
The Scoop @ Stone Gable
Inspire Me Tuesday @ A Stroll Thru Life
Wow Us Wednesdays @ Savvy Southern Style
Vintage Inspiration Party @ My Salvaged Treasures
Dream Create Inspire @ Refresh Living
Creative Spark @ Two Purple Couches
 |  |
 |


This is awesome! It turned out really nice.
ReplyDeleteThanks Michelle! ;o)
ReplyDeleteVery beautiful and creative---LOVE!
ReplyDeleteLucy.
ReplyDeleteThis is so your signature.
Very creative and pretty to boot! I can't even tell you which part of it is my favorite. <3
Lucy this is absolutely beautiful....thank you for sharing at Share it One More Time.... Tammy
ReplyDeleteLucy this is stunning! You'd never know it was made up with all those mix and match pieces because they are all unified so beautifully. Pinning
ReplyDeleteWonderfully Iced Lucy, love the embellishment pieces you chose, they fit the bill perfectly! Great patina as well... I really need to get into Farragoz!
ReplyDeleteThank you ladies! Appreciate you taking the time to leave such sweet comments! ;o)
DeleteLove love love this piece. You did such a great job!
ReplyDelete~Tami @ Curb Alert!
Very creative! Looks fabulous :)
ReplyDeleteLucy, you did an awesome job on this and it looks so authentic. Love your explanation of how you did it. Thank you for sharing at Share It One More Time. Cathy
ReplyDeleteThis is patina perfection - love the deep textural color of the piece. Pinning and sharing!
ReplyDeleteLucy! I so love this! What is totally funny is I clicked on over from DIY Showoff and was tickled pink that it took me to Patina Paradise! I didn't know it was going to be YOUR project. I love this! I clicked over because I have plans to do something like this for my master bedroom, but paint it a clean light gray. It looks fabulous! I hope you win!
ReplyDeleteThank you Tami, Cathy, Donna and Nancy! :o)
ReplyDeleteThis is beautiful. Great job. I truly love it's patina.
ReplyDeleteJanet
Wow! Truly gorgeous! Thank you for sharing the step by step!
ReplyDeleteI hope you will share the other two :)
Your newest follower :)
Wow!! This looks so incredibly old! You did an amazing job at creating a really unique mirror from different pieces that look like they were made to go together once painted. I have an old mirror that I've been wanting to do this to so I'll have to pin your post so I can look back at it!
ReplyDeleteLooks beautiful! I like the texture and layering, oh so great! You really did a great job putting this together. Adding the shelf was a great idea.
ReplyDeleteI LOVE mirrors - even have a pinterest board for them - and this?
ReplyDeleteIt's going to take top place on the board - it's fabulous !
It's on my list of things to do - now I'm more determined than ever
Thanks SO much for sharing !
xxx
Thank you Janet, Jamie, Sara and Suzan! You made my day!
ReplyDeleteBeautiful! A trumeau is on my to do list. Your paint techhnique is gorgeous. I just love the way it turned out. I'll be cheking out my local HD for that plank too. Thanks for the tip.
ReplyDeleteThis is insanely beautiful! Love it love it love it!
ReplyDeleteI love the mirror! You are a genius! Thanks for sharing your inspiration.
ReplyDeleteHugs,
Patti
Wow this is fabulous! This looks like you can picked the entire piece up from an antique store. Pinning!
ReplyDeleteHi Lucy, just stopping by to let you know you are one of the features at the Share It One More Time link party tomorrow. I love this project - just gorgeous. Thank you for linking up with us - hope to see you next week. Cathy
ReplyDeleteThanks Cathy for the feature!
DeleteLucy, it does, indeed, look authentically old. I wasn't sure how it'd turn out but as I scrolled, I relaxed more. You did a great job. I saw your link at the Treasure Hunt Thursday party.
ReplyDeleteWow, you really turned it into a beautiful piece. Love the painting technique! I will be doing a Farragoz class give away on my blog soon. Wish I could win it! lol! Thanks for sharing with SYC.
ReplyDeletehugs,
Jann
Lucy, this is simply spectacular!
ReplyDeleteThis is absolutely gorgeous! I'd never know that this was a new piece, it looks like an authentic Trumeau mirror. Thank you for sharing your technique at Vintage Inspiration Party.
ReplyDeleteHi Heidi, just hopping by to let you know that you will be featured at SYC this week.
ReplyDeletehugs,
Jann
Sorry Lucy, I called you Heidi!
ReplyDeletehugs,
Jann
What a gorgeous piece of History that's actually new!! When I first seen the picture, I thought you restored it. You truly have an creative soul. Can't wait to see what else you've got stored behind those eyes. Great job, Ms Lucy!!!!
ReplyDeleteWhat a fabulous project!
ReplyDeleteThank you ladies!
ReplyDeleteAmazing project…all those layers, really pay-off in the end. I'm glad you documented the process here, because I know I wouldn't be able to remember how to do all that. Have a piece I'm working on now---that maybe perfect for some of that finish!
ReplyDeleteBeautifully done!!
ReplyDeleteWOW!!! So creative and what a masterpiece! love it.
ReplyDeleteStunning! I love it! Congrats on winning the contest! You deserve it!
ReplyDeleteStunning! Congrats.
ReplyDeleteCongratulations!!!
ReplyDeleteThank you ladies! It was really a labour of love and I am so grateful for having won!
ReplyDeleteThis is FABULOUS! I would of never thought you pieced this together!
ReplyDeleteI love your creativity Lucy ... is so beautiful...congrats¡¡¡
ReplyDeleteOk this is WAY more than I ever could have done! Seriously, it's fabulous and I can see why you won!!! Congrats!
ReplyDeletexoKathy
This mirror is gorgeous. It does look antique.
ReplyDeleteLucy,
ReplyDeleteI can't get over how beautiful this piece is! I'll be pining and sharing your post! Great job! and congratulations on the win! Thanks for sharing at Dream. Create. Inspire. Link!
Cat
Thank so much ladies! I feel so blessed to have won the competition.
ReplyDeleteYou did an outstanding job. I will be featuring this tonight at my Fall into Fall link party. Please stop by and pick up an I've Been Featured button. Thanks. http:/diybydesign.blogspot.com
ReplyDeleteHaving lived abroad and dragging my husband and young daughter to many, many museums, I can attest that you have created a masterpiece. Bravo!
ReplyDeleteDarling, there is only one thing that I would critique about your project. To make it really authentic take the mirror out and replace it with one that is either damaged or homemade looking! Really great job though of reconstruction!
ReplyDeleteThis is stunning! I've been dying to take the course and plan to ASAP! One quick question-is the glaze you used homemade as well or is it something you purchased? Thanks
ReplyDeleteJess and Josh,
ReplyDeleteThe glaze I used is a Valspar brand clear glaze bought at Lowes. You can add any acrylic paint to it and it will act like a semi-transparent layer. Hope this helps.
It does, very much so! Thank you for replying! You're very creative and I'm inspired to try a similar finish. ��
ReplyDeleteThis is simply stunning. Brava!
ReplyDelete