I have been wanting to create a burlap GIVE THANKS banner for Fall and Thanksgiving for a while now, and knew exactly what I was going to use to make it. Now to decide what shape and what colour… so many possibilities…
I had a stash of painted burlap sheets from some banners that I had made for my first craft show this Spring. I only needed to decide which colours to use.
What you will need for this project...
- painted burlap fabric or laminated burlap sheets in white and natural
- good pair of scissors
- scrap paper for cutting out the templates
- hot glue gun
- twine or ribbon
- craft paint in brown and green or any other colour you like
- stencil for lettering
- makeup sponge or stencil brush for applying paint
I had some brown, green and white and decided that I was going to make some acorns to add to the banner. *Note that the burlap is very porous and will soak up a substantial amount of paint. Once it has dried it will have a tendency to want to curl, so place the sheets under some heavy books to flatten them out. Of course you can also leave the burlap its natural colour and use glue or fabric stiffener on it to stop it from fraying.
Once you have your burlap ready to use, you need to cut templates out of paper. I really like this particlar shape of "pennant" for banners as it allows for the letters that are wide to fit as well as those that are thin. I folded a piece of paper in half to cut out templates for the acorn and banner shapes. I decided that I wanted to make mine small enough to fit a particular piece of wood that I have in my Autumn entry display. You will need 10 little "pennants" to spell GIVE THANKS.
Once you have cut out your acorn shape and top, use the hot glue to attach them together.
The stencil above I had cut out of a transparent file folder from another project and it was just the right fit. I like using a makeup wedge sponge to dab the paint on the letters. Dab the excess on a piece of paper towel before dabbing onto stencil. You could also paint the letters freehand if you don't have a stencil.
Once you have stencilled the letters on the single banners and cut out and glued the acorns you are ready to assemble your banner. Measure out two long lengths of twine. Now turn the flags over and remember to place the letters from right to left… With the first letter of each word on the far right and continuing to the left. One by one add each flag starting on one end and continuing until you have finished both rows.
You can attach the two banners to the top and bottom of the acorn. Of course this is optional and does not make a difference. (Having done this and learning from my experience, I would probably glue all of the pennants together first and then stencil on the letters.)
Once I turned the banner over and placed it where I wanted, the acorns disappeared into the background, so to punch them out, I used the same brown paint that I used for the letters and dabbed a the edges of the acorns and acorn tops with it.
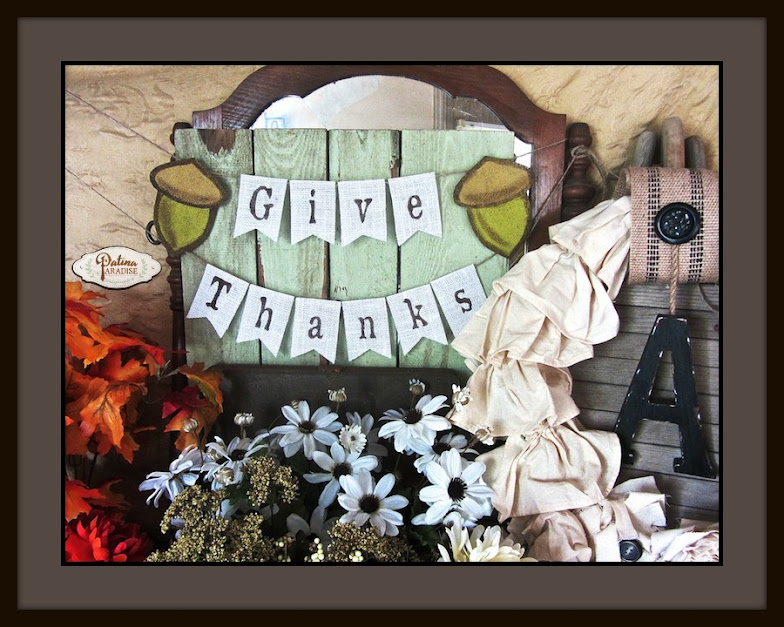
Here you can see it in my Autumn vignette. I love how it looks together with everything else. It's a good reminder to be grateful and to give thanks for everything!
You can see how I made my funky wire and bottle pumpkins
HERE
And You'll never guess what I made the wreath in the display above out of. You can find all of the details
HERE
Hope I have inspired you to try your hand at making a simple banner for Fall or Thanksgiving.
Blessings,
Lucy
Partying at these locations…
Before and After Linkup @ Thrifty Decor Chick
What's It Wednesdays @
Ivy And Elephants
Treasure Hunt Thursday @ From My Front Porch to Yours
Swing into Spring @
DIY by Design
Talented Tuesdays @
Home Remedies
Dream Create Inspire @
Vintage Refined
From Dream to Reality @ The DIY dreamer
Swing into Spring @
DIY by Design
Wow Us Wednesdays @
Savvy Southern Style
Vintage Inspiration Party @ My Salvaged Treasures
Creative Spark @ Weekend Craft
Share Your Cup Thursday @
Have a Daily Cup of Mrs. Olson
Home and Garden Thursday @
A Delightsome Life
Share Your Style @
Common Ground
Feathered Nest Fridays @
French Country Cottage
Creativity Unleashed @
Practically Functional
Fridays Unfolded @
Nancherrow
Shabbilicous Fridays @
The Shabby Art Boutique
Inspiration Friday @
The Painted Drawer
Frugal Friday @
The Shabby Nest
Show and Tell Friday @
My Romantic Home
A morning Cup of Joe @
The Cottage Market
Simple and Sweet Fridays @
Rooted in Thyme
DIY Inspired @
The Girl Creative
Anything Blue Friday @
The Dedicated House
Upcycled Link Party @ Funky Junk Interiors
Saturday Sparks @ Pieced Pastimes
Share it One More Time @
One More Time Events
Sundays at Home @ Thoughts From Alice
That DIY party @
diy showoff
Inspiration Monday @ Redhead Can Decorate
Something to Talk About @ Spain Hill Farm
Inspire Me Monday @ Sand and Sisal
The Scoop @ Stone Gable
Creative Spark @
Two Purple Couches


Love it! I'm a banner girl, too! I made one for summer, but haven't yet for fall......I have no excuse, I already have burlap triangles cut out and ready to go! Ok, so maybe I'll have to throw one together soon (like before fall is over!) xoKathleen
ReplyDeleteLove your banner Lucy and I especially love how you hung it onto painted pallet boards. The entire Fall Vignette is so pretty and well done.
ReplyDeleteThis is SO cute! I used acorns and burlap in my fall decor too! Please join us for a new link party, Thurs Oct 15 Vintage Charm to link your vintage & repurposed projects! Blessings, Cecilia
ReplyDeleteSuch a cute banner! I love the texture of the burlap! Thanks so much for linking up with us at The Creative Circle!
ReplyDeleteThis is a super cute banner!! Love it! I would like to invite you to my DIY Crush Craft Party which starts at 7pm EST. and is new every Thursday. I'll pin every post!! ;)
ReplyDeletehttp://www.diy-crush.com/blog/category/link-party/
I'm back again! (Seriously, I'm not stalking you!) Just wanted to thank you for joining in on our Vintage Charm Link Party! Hope to see you next Thursday! xoKathleen
ReplyDelete