Can you believe that February is almost over! I can't but this means that it's time for another "Project Challenge". This month the item up for challenge is "CLOCK FACES". I have a slight obsession with clocks especially since finishing my first one for the Farragoz online class. For this challenge I chose to make a clock face that had been in my mind as an idea for quite a while... so glad that it is now another finished project to cross off my list...
Make sure to check out all of the other creative clock face ideas by my fellow Project Challenge Bloggers.
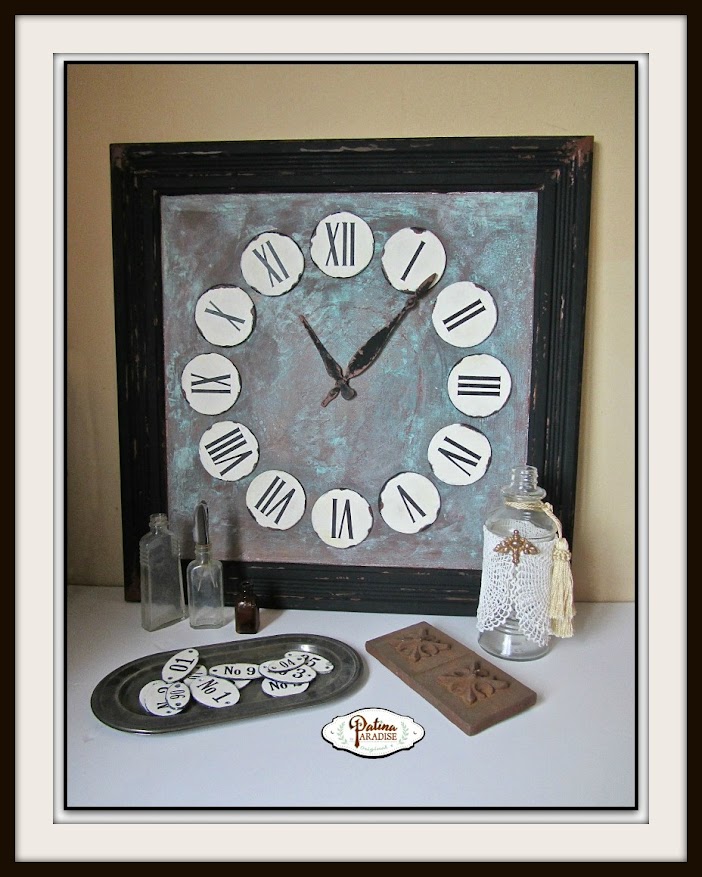
So this is what I started with... a large square MDF and wood framed cupboard door.
I had been wanting to give
Modern Masters Metal Effects a try for forever, so when I was offered the opportunity to do a sponsored post for Modern Masters I was excited to finally use the Green Patina Effects for this project. The first step in the process was to paint the area I wanted to be verdigris with a special primer which came with the kit.
(*I was given Modern Masters Metal Effects Green Patina product kit in exchange for a blog post but all opinions are my own.)
For more information on how to purchase this or other Modern Masters products the following links might be helpful...
Retailers:
The next step was to apply two coats of copper paint. I taped off the area that was going to be painted with the faux verdigris to protect the chemical agent from getting onto any other areas. The first coat was to be left to dry for half an hour... and the second coat was applied and then while still wet to be immediately activated with the patina activating solution.
(Make sure to use gloves when spraying or working with the activator and make sure to have good ventilation or fresh air to do it in!)
Here it is once the activator was added. Using different application methods gives you different results. I mostly used the sprayer applicator and a small paint brush to get this effect. It was really magical to see the results show up after only a few seconds. Whatever spots I was not happy with the results I reapplied more copper paint and more activator.
I designed the clock face on my Silhouette Designer program. This way I could make sure that the numbers fit perfectly onto the wood circles I had prepared to look like faux enamel.
I used my Silhouette machine to cut out the stencils for each of the numbers out of inexpensive shelf lining paper from the Dollar Tree. And a makeup wedge sponge to apply the black paint onto them. The results were so crisp and clean. You can see the steps I used to make the faux enamel clock parts
HERE. The round wooden pieces can be found at most craft stores and come in a package of 6.
This is where I had left the clock not sure how to proceed. I wasn't crazy about the color of the cupboard frame with the verdigris ... there wasn't enough contrast for my taste.
I finally decided to go bold and give it more contrast by painting the frame black with bits of faux rust for more interest. I used the MM primer as faux rust and I think it worked nicely. But it was still missing something...
It still looked unfinished to me and although I knew from my attempts last year that the cupboard door was too thick to allow for a clock mechanism... I thought some clock hands would add a great touch. That was when I remembered that I had purchased some wood Christmas ornaments a while back thinking they would make great clock hands... and lo and behold... a little bit of cutting for the small hand and they were ready to go.
I gave them the same finish as the clock frame and think it finally looks finished... and they look perfect... don't you think?
Wow I am so glad this challenge kicked me in the backside and got me to finally finish this project. Gotta love a deadline and a blog hop! ;o)
But I am still undecided as to whether or not it is truly finished... I may just add a city name in the lower central part of the clock... what do you think? If I do decide I still have to figure out just what city name to use... decisions, decisions... any suggestions?
I think the enamel and verdigris look so realistic and wonderful together. I love that it is one of a kind and will probably have a hard time letting go of it...
But I am already thinking about making another one with some leftover pieces of wood from a repurposed bill organizer... and because my stash of square cupboard doors is gone I would have to find another source... but I see potential materials for clock faces everywhere I go... at least in my mind the possibilities for making clock faces are endless...
Hope I have inspired you to make your own French inspired clock face!
If you would like to see my other clock face project that I finished for my Farragoz classes you can find it
HERE. And I did make a functional clock with another thinner cupboard door that you can find
HERE.
Blessings,
Lucy.
Make sure to click on the links below to check out what my creative blogging friends have come up with for this month's projects...
And make sure also to come back next month when the material up for challenge is CHALK PAINT!


Lucy this is just over-the-top wonderful! I love that you went with the black frame as that really made the faux metal pop! And the hands! From wood christmas ornaments?! BRILLIANT my friend! If you add a city name - how about one that means a lot to you or one that makes you smile to think of going there?
ReplyDeleteHi Lucy, the clock is beautiful. I love the roman numbers and all the paint choices!!!! Wonderful!!!!!
ReplyDeleteWow Lucy this really came out just beautiful love all the color choices and how you blended them to look like metal...very nice!
ReplyDeleteI love that the paint looks like metal. My favorite though, has got to be the hands of the clock. Ornaments?! What a great idea and further reminder of how important it is to think outside our little box. Bravo!!!
ReplyDeleteSo cool! Thanks for sharing, Lucy! Tania at FARRAGOZ ~ Online Course in The Art of Patina
ReplyDeleteYou are "Queen Patina". I love your metal techniques and this is gorgeous, Lucy! Pinning to my "Clocks" Pinterest board. Definitely trying this method on a project. Thank you for sharing!
ReplyDeleteLucy, don't you just love working with the Modern Masters Metal Effects Kits! I have so much fun with it and you can get so many projects out of one bottle. Love your clock - pinning to share.
ReplyDeleteI really like the final look of this - the metal effect looks great!
ReplyDeleteLove the patina you put on the clock! It looks wonderful...you're very crafty. You have to come link this up at Welcome Home Wednesdays. Party is now open! www.suburbansimplicity.com
ReplyDeleteYou did a great job on your clock - can't wait to see what you do next!
ReplyDeleteThanks for sharing at SYC.
Great job Lucy. I love the patina on the background! Sounds like a wonderful product. Thanks for sharing with SYC.
ReplyDeletehugs,
Jann
Lucy, This project is super nice. I love the black frame and the hands are great. The way you did the numbers was very effective. Sylvia D.
ReplyDeleteThis is amazing. I am super impressed. So glad you shared with us at The DIY Collective! Be sure to come back again this Thursday at 6am/ET. I know everyone would love to see what else you have been up to!
ReplyDeleteBrooke~Re-Fabbed
You always amaze me with your talent! I'm loving this clock to pieces! Thanks for sharing at Vintage Charm. Hope to see you again this Thursday:) xo Kathleen
ReplyDelete