I am so excited to be a part of an amazing group of bloggers who paint furniture. And I am jumping right in with a piece that has an "Industrial" feel. That is this months theme. It took me out of my comfort zone, but I am so glad I put myself to the challenge. Let me know if you think I hit the mark...
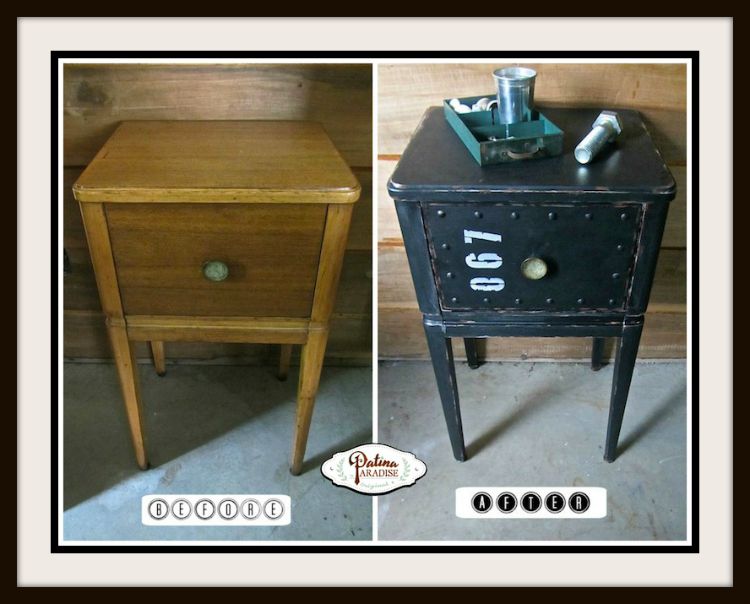
I have to admit "Industrial" was a challenge because most of the furniture pieces that I am attracted to usually have curves or lots of carved details. Then as I was looking through my stash of furniture, I remembered this nightstand that I had recently picked up at a yard sale for $5. It had simple lines and I figured it would do the job. I had a certain design in mind, but knowing that the hardware that I had ordered probably wasn't going to arrive in time, I changed my plan since I knew I was going to keep the original knob. But it didn't bother me too much since the knob has some yummy PaTiNa!
This nightstand was probably made in the 50s, or at least it has a certain vintage vibe that lent itself well to be transformed into an industrial piece.

I began by painting it black using some "Blackberry House" Paint that I had left over. I was so glad to have enough to use on this project. I love the fact that it is highly pigmented so that after one coat, I had almost complete coverage. Excuse the blue painters tape which was put on to add some character to the edges of the drawer with paint. See below…
1. Use narrow tape to measure out an equal edging on the drawer and then add painters tape to the inside. 2. Remove tape on the edge and you are ready to add some paint. 3. Use rust coloured paint and a touch of silver paint on outer edge of the drawer and the outer edge of tape. 4. The nailheads were originally gold coloured and I painted them black with tiny bits of rust and silver paint as well. In order to save time, I used my Silhouette designer program to create a printout of evenly spaced dots to indicate where the nailheads would go. Placing it on the drawer front I hit the nailheads halfway in one at a time. 5. Once they are all halfway hammered in, tear off the paper and hammer them all the way down. 6. I lightly sanded the facade to give it more of a worn look.
7. This number stencil that I bought at Walmart did the trick to add just a bit more of an industrial vibe. To paint the numbers I used some outdoor acrylic paint, (but you can use regular acrylic), and a makeup sponge wedge to apply it to the stencil.
I chose not to distress the stencilling as it already had a weathered edge, but I may do so later on.
When trying to get a rusted metal look, paint the rust around the edges of the piece, where it would naturally rust and then add tiny bits of the silver paint to the rusted areas, so that it looks authentic. Make sure to vary the sizes and shapes of the rust and silver. I used a small brush, loaded it up with paint and dragged it across the edges, twisting it slightly as I went along so that I would get thick and thin spots. I am so pleased with the results. I think it would look great in a boys room.
Hope I have inspired you to try your hand at painting something to look like faux metal. What do you think? Does it look like the real deal?
Oh and if you liked this post you may like to see another faux finished piece that I used the same stencil set on.
You can find the tutorial for it
HERE
Blessings,
Lucy
Make sure to check out some other great Industrial pieces from my furniture painting blog buddies for more inspiration!


You rocked this makeover! Awesome job and great vision. Love, LOVE it! XO- Wendi@H2OBungalow
ReplyDeleteWow! You did it over the top!
ReplyDeleteIt looks like metal and it's unique!
Great job :)
Wow, Lucy! That is the coolest! I agree, what vision!
ReplyDeleteNancy
This is gorgeous. It's time for a pin!
ReplyDeleteWow, I thought it was an old leather or metal suitcase. What a fun makeover. Jeanette
ReplyDeleteWow Lucy! You would never know this was the same piece! I love the makeover you gave it.
ReplyDeleteThanks ladies for your kind comments! So honoured to be among so many talented bloggers!
ReplyDeleteOh my, that is gorgeous! Such an amazing transformation, it doesn't look like the same table. Love the industrial vibe!
ReplyDeleteLucy- welcome to the group! You really did a fabulous job with this makeover! The paint job is perfect- and nailheads make my heart go pitter patter <3
ReplyDeleteGreat makeover! You made this piece look like it has been around for a long time and has many stories to tell.
ReplyDeleteOfficially the best piece of furniture I have seen in a couple of weeks! Love the patina. You "nailed" it. I would like to follow you - How do I do that? You need to take this piece over to Miss Mustard Seed tonight. Pinning and sharing.
ReplyDeleteThat is awesome, Lucy! What a vision and I love your details. So happy you're in the group!
ReplyDeleteThanks Larissa, and ladies, so happy to be in the group!
ReplyDeleteLucy, this is an awesome transformation and got the rustic industrial lookperfect. Love it. Thank you for sharing at Share It One More Time. Cathy
ReplyDeleteOh goodness I love this! The best part is my husband will love it too! Thanks for the great tutorial :)
ReplyDeleteWow this is so gorgeous! What an amazing job you did...I love the industrial look!
ReplyDeleteSERIOUSLY!! THIS IS AWESOME! What an AMAZING transformation! Just stunning.
ReplyDeleteHugs,
Karin
www.artisbeauty.net
Lucy, you really did a great job bring out an industrial look to this piece...love it ,... Thanks for sharing at Share it One More Time...Tammy
ReplyDeleteWow, it turned out great! I really looks like metal!
ReplyDeleteTania
Wow! You did an AMAZING job on this! I think it looks like worn, rusted metal. Super nice.
ReplyDeleteI used furniture tacks today on my blog to make a map frame. I love the look and your table is amazing. My next project - a faux industrial table! Thanks for sharing.
ReplyDeleteI LOVE how this turned out! You did a beautiful job! I love how you added a link up for
ReplyDeleteOthers to showcase their industrial inspired projects! I haven't made any yet but it's on my to do list!
This is great, love it!
ReplyDeleteStunning transformation! It doesn't even look like the same piece - well done!
ReplyDeleteTami
Nice...I love the change. Great job
ReplyDeleteNice...I love the change. Great job
ReplyDeleteNice...I love the change. Great job
ReplyDeleteYou did a fabulous job! I love it!
ReplyDeleteLove a faux metal finish and you did a great job on that end table! Here from Bliss Ranch and following you now on Google+.
ReplyDeleteHow very creative and fun. You really did a great job totally transforming this piece. I saw your link at the Art Is Beauty link party.
ReplyDeleteSuch a great outcome! Well done! Sharing tonight on The Painted Drawer Link Party and thanks for linking up!
ReplyDeleteBrilliant, simply brilliant! Cheers, Ardith
ReplyDeleteI am so impressed! The faux finish is perfect and I love this piece!
ReplyDeleteHi Lucy... Just stopping by to let you know you are one of the features at Share it One More Time....Thank you so much for sharing....looking forward to seeing what you have to share this week!!! Tammy
ReplyDeleteThis is amazing! It has giving me an inspiration for something I've been staring at!! Thanks!!
ReplyDeleteWOW! If I hadn't seen the before pic I would have totally thought it was metal! Great job!
ReplyDeleteThis comment has been removed by a blog administrator.
ReplyDeleteI am in LOVE with this piece!! Nice job!!!
ReplyDeleteThis turned out great! love it... in fact, I like your industrial vibe on most of your pieces. I'm going to check out some more! I saw this linked to MRL! Great job.
ReplyDeleteLucy, thanks for sharing this at the brand new Talk of the Town party - you are featured this week!
ReplyDeleteI love the look of this table!
ReplyDeleteI love how it turned out.
ReplyDeleteI've got the right piece for it! Thanks for the inspiration!!!
ReplyDelete