Hope you had a wonderful and blessed Thanksgiving! It's time for "Project Challenge" once again. This month the item up for challenge was "Bead Board". I had never used it for a project... but now I am enamoured with the stuff. It's so versatile and I love the cottage vibe that it gives off. Come see what myself and the others in the group have come up with for Christmas...
I had picked up some cast off pieces of bead board at a cabinet makers shop in a small nearby town. About a year ago, I drove by their place and saw a few cabinet shells outside the shop in the grass and inquired about them. I found out that they were "garbage" and were going to be burned the next day. I had my hubby drive out there reluctantly to pick them up, but now thanks to me and the cabinet shop, he has some great garage storage. It never hurts to ask! ;o) Since then, I always check their outside burn pile and stop to stock up on bits and pieces for projects when I am in the area.

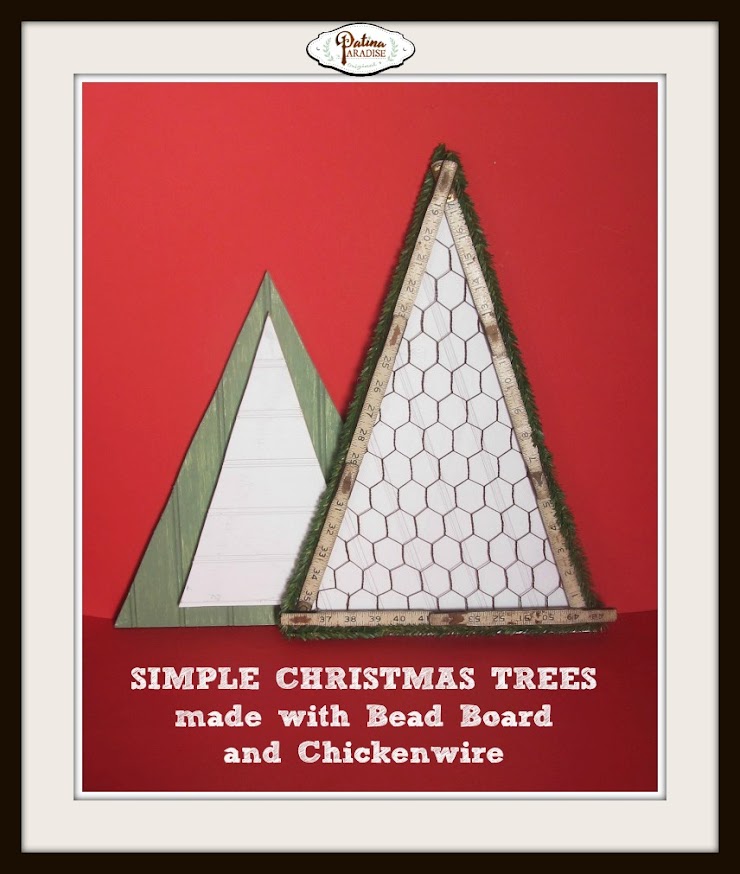
For this challenge, I wanted to make some trees out of this large piece of beadboard. My first thought was to paint and distress them afterwards, but I wasn't thrilled with the results. So one night when I was awake and trying to figure out the possibilities, I remembered that there was some rusty chicken wire in the backyard that was waiting to be used. I placed it over the bead board and loved how it looked. The plan was to use trim on the edge to hold it down and to use the evergreen sticks in some way.
But when I spotted this old wooden folding tape measure in my stash, I grabbed it and spread it out. I was in love and had my hubby cut the piece of bead board to fit it's size (18 inch sides and 10 inch bottom). The chicken wire was cut with wire cutters to fit over the bead board.
(Be careful when cutting chicken wire. I recommend using gloves to prevent the sharp edges from possible injury). It was cute but needed something else.
I tried the evergreen sticks as an edging and loved how they finished it off. I ended up using hot glue to add all the pieces together. It would probably be a good idea to use a staple gun to adhere the chicken wire to the bead board to make it more permanent, especially if you were going to hang anything off of it.
This is the original tree that I painted and wasn't too happy with. The plan was to have these two tree shapes be the backdrop for the taller tree.
But when I laid the small white tree on the wider green one, they looked as though they were made for each other. So in the end I had two simple and rustic trees that I was happy with, and that would make a great backdrop to any Christmas decor.
The old tape measure is pure patina perfection! I wish I had a box full of these to craft with.
Anything I added to the trees seemed to detract from them. But I did like how a sprig of artificial red berries looked tucked into one corner. Something about their simplicity speaks to me. I am still on the hunt for the perfect star with which to top them, but for now enjoy just looking at them as they are.
You could make a larger version of the these trees and use the chicken wire to add Christmas Cards to with clothespins, or to hang vintage ornaments on... let your imagination run wild with the possibilities... and give bead board a try. You won't be sorry...
And for more Bead Board inspiration, make sure to click on the links below to check out what my creative blogging friends have come up with for Christmas projects...
Blessings,
Lucy.
Partying at these locations…
MONDAYS
Something to Talk About @ Spain Hill Farm
Inspire Me Monday @ Sand and Sisal
The Scoop @ Stone Gable
Before and After Linkup @ Thrifty Decor Chick
TUESDAYS
Moonlight and Mason Jars @ Cherished Bliss
Inspire Me Tuesday @ A Stroll Thru Life
Wow Us Wednesdays @ Savvy Southern Style
Vintage Inspiration Party @ My Salvaged Treasures
Dream Create Inspire @
Refresh Living
Swing into Spring @
DIY by Design
What's It Wednesdays @
Ivy And Elephants
WEDNESDAYS
Creative Spark @
Two Purple Couches
Share Your Cup Thursday @ Have a Daily Cup of Mrs. Olson
Home and Garden Thursday @ A Delightsome Life
Share Your Style @ The Vintage Nest
Treasure Hunt Thursday @ From My Front Porch to Yours
THURSDAYS
Brag Worthy Thursday @ Bless'er House
Think and Make Thursdays @ Little Red Brick House
The Creative Circle @
Up to Date Interiors
Vintage Charm @
Charm Bracelet Diva
Shabbilicous Fridays @ The Shabby Art Boutique
Feathered Nest Fridays @ French Country Cottage
Simple and Sweet Fridays @
Rooted In Thyme
The Inspiration Gallery @ craftberry bush
Creativity Unleashed @ Practically Functional
Show and Tell Friday @ My Romantic Home
the weekend retreat @ AKA Design
Inspiration Friday @ The Painted Drawer
FRIDAYS
A morning Cup of Joe @ The Cottage Market
Upcycled Link Party @ Funky Junk Interiors
SATURDAYS
Saturday Sparks @ Pieced Pastimes
Share it One More Time @ One More Time Events
DIY Sunday Showcase @ The Interior Frugalista
Sundays at Home @ Love of Home
SUNDAYS
Silver Pennies Sundays @ Finding Silver Pennies
Inspired By You @
Reinvented
Inspiration Monday @ What Meegan Makes
Amaze Me Mondays @ Dwellings


I love that you have a "drive by" to pick up free treasures! I love what you did with the beadboard. The Christmas trees are darling and that measuring stick...no words. LOVE!! ;)
ReplyDeleteI love how simple this is--such a perfect use for beadboard.
ReplyDeleteHi Lucy, oh yes the red berry's are a great touch and simple is often times the best!!!!! I love your idea and the chicken wire is such a wonderful touch!!!!
ReplyDeleteLucy these are so great! I love that you used the old folding ruler - love those things and have a small collection of them. I like the addition of the sprig of red berries too :)
ReplyDeleteSo much wonderful charm! Your trees are just so cute! I know what you mean about wishing you had a stash of vintage tape measure. I have used them quite a bit over the years and just love the interest they add to a project.
ReplyDeleteI want every room in my house to have bead board! So far, just the powder room! Love your tree! Great idea to use chicken wire. I'm going simple and more rustic this year myself. Hope you had a nice holiday. XoKathleen
ReplyDeleteWhat a cute tree. I love it's simplicity and the rustic look.
ReplyDeleteWhat a great idea! Pinning!
ReplyDeleteLucy those trees are amazing! I love them so much, each detail is perfect. Would you mind if I share this on RoadKill Rescue?
ReplyDeleteThanks ladies, not at all Kimm, feel free to share them on Roadkill Rescue! ;o)
DeleteThis is such a cute idea and turned out looking great!!
ReplyDeleteooooo, these trees are so adorable! And the perfect project for scrap parts. Love it!
ReplyDeleteI like the way you think Lucy - these are so adorable!
ReplyDeleteThese trees are so cute! I love the wood folding ruler - what a nice rustic vintage touch!
ReplyDeleteLucy,
ReplyDeleteI love, love, love these! I impugning and sharing your idea! Thank you for linking up with us at Dream. Create. Inspire. Link!
Cat
These are so creative!! I just love them. Thanks for sharing at The Creative Circle. xoxo
ReplyDeleteHey girlfriend! Just a heads up, you're being featured at Vintage Charm tomorrow (well, today, really) morning! Congrats! Can't wait to see what else you have in store for us!:) xoKathleen
ReplyDeleteDropping over from My Thrift Store Addiction. Great idea for background trees. Pnned. Enjoyed.
ReplyDeleteI made a folding ruler tree about a month ago with burlap as the backing. Yours looks fabulous with the bead board and chicken wire. Love the two trees together.
ReplyDelete