DIY Wood Banner
Rustic Farmhouse Tray
DIY Street Number Sign
Tool Tote
What you will need for this project...
- pallet wood (flat and without nails)
- thin balsa wood (optional for the doors and hayloft cutout)
- tongue depressor (for the roof)
- red and grey craft paint
- stain for wood (glaze or watered down paint would work also)
- faux snow (recipe below) (optional)
- glue stick and hot glue gun
- mini bottle brush tree (optional)
Steps...
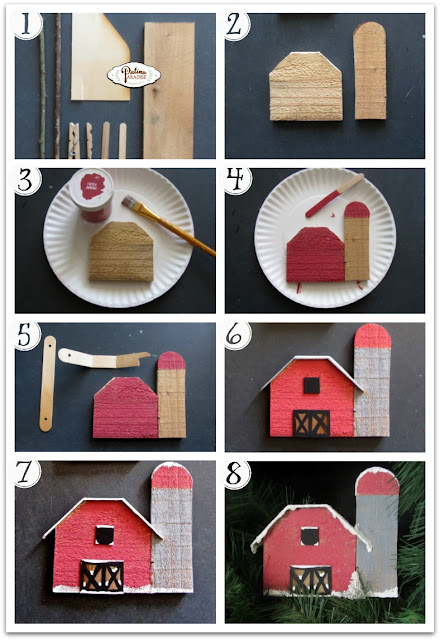
1) Find some pallet wood, thin balsa wood and a tongue depressor.2) Cut out a barn and silo shape out of the pallet wood.
3) Paint the barn red as well as the top of the silo.
4) Let the red paint dry and then paint the silo in gray. Once dry hot glue pieces together.
5) Using an exacto knife score the tongue depressor to fit the roof shape and snip an edge out to accomodate for the shape of the silo. (You could use twigs or popsicle sticks if you can't find tongue depressors).
6) Cut a rectangular piece of thin wood for the doors and a square piece for the hayloft opening. Paint the hayloft opening black and the outline of the doors in a black double x pattern.
7) Add some white paint to the roof of the barn and silo, the top of the doors, window and ground. (Do not glue the pieces on until after you have added the faux snow in case of dripping).
8) You can add some faux snow to the roofs and add a snow covered mini bottlebrush tree to finish it off. You can find the recipe and detailed directions for the faux snow below.
Recipe...
- 1/2 cup Baking Soda
- 1/2 cup White Glue
- 2 tbsps. White Chalk Paint or Craft Paint
Directions...
Using a container of your choice add the first 3 ingredients. (I mixed mine in a plastic container that had a lid so that I could store it when not in use). Mix
well with a whisk or fork, or hand held blender. The consistency should
be like that of cream cheese frosting. Do a drip test on a piece of
scrap wood. It should pretty much stay put. If it is too runny add more
baking soda, if it is too thick, add more glue. It can be
stored for a few days. The glitter is also optional, but should be
sprinkled on top soon after. (Wash out your brushes when you are done with soap and water.)I think it would look great on a wreath or as an ornament hanging on a tree...
or simply on a shelf with some vintage bottle brush trees...
Make sure to check out my latest ornament, a little log cabin that you can find HERE.
Blessings,
Lucy


Your ornaments turned out so great! I was noticing and pattern and wondering if you were working on a village. I love it!
ReplyDeleteoh my the snow is such a clever idea Lucy, truly super cute ornaments. You can make me about 15 of them now, can't you? LOL
ReplyDeleteThis is seriously adorable, Lucy. With my obsession with barns, you gave me some crafting ideas to do for Christmas! The church is beautiful. If you're working on a small town, what's next??? General store??? I can't wait to see more. Love these ornaments!!
ReplyDeleteYour ornament is darling, Lucy! SO creative and such a fabulous result. Thanks so much for sharing it with us all at Vintage Charm :)
ReplyDeleteSuch adorable ornaments!
ReplyDeleteDarling pallet wood ornaments Lucy. The barn is my favorite! I have had Christmas on my mind as well. I've done a bit of crafting before time to pull out the décor. Thanks for sharing with SYC. Also, excited to have the faux snow recipe. I have bought it, but never made my own.
ReplyDeletehugs,
Jann
Great ornament Lucy, Very cute and oh so creative. Making snow is a fabulous idea. Thank you for sharing at DI&DI.
ReplyDeletePinning. I just saw some similar decorations for $11 each. Well worth the effort.
ReplyDeleteLovely. I'll take rustic over cute any time.
ReplyDeleteAmalia
xo
This is super cute! How creative and fun, great job :) Thank you so much for joining the party at Dishing It & Digging It!
ReplyDeleteYour ornament is adorable! I love it. Thank you for sharing at the Snickerdoodle Create~Bake~Make link party!
ReplyDelete