
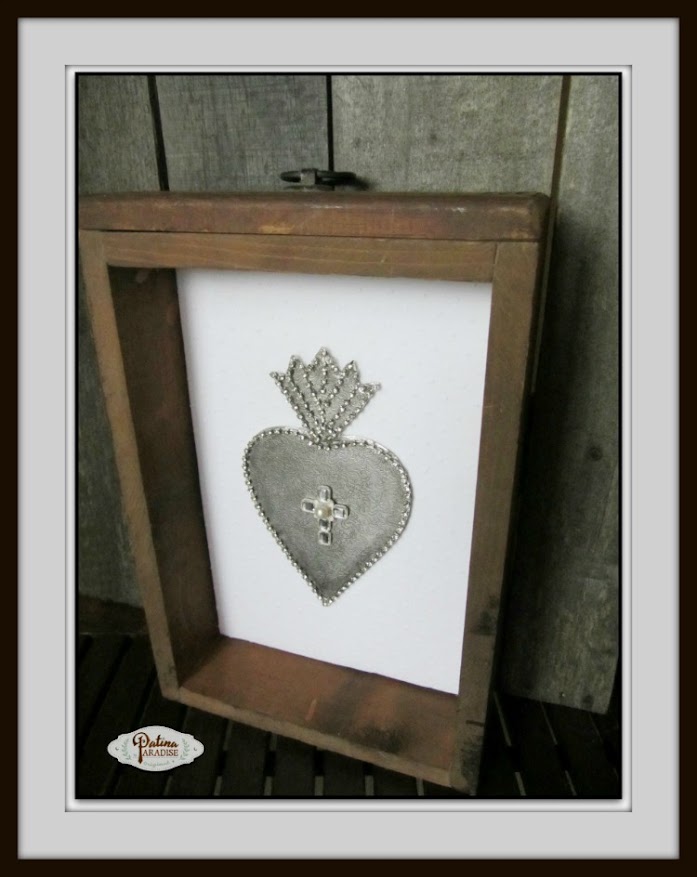

For this challenge I decided to figure out a way to make something that I love but can't afford to buy... a silver ex-voto Sacred Heart.


- I started by cutting out a paper shape and tracing the outline onto the aluminum tray.
- Using a heavy duty pair of scissors cut out the shape. (be careful when cutting as the edges can be sharp and can prick you)
- I wanted it to have an antique silver look so I mixed some black paint with clear glaze and matte varnish. Using a brush I painted it on the entire piece. Using a rag to wipe the excess off, I continued these two steps until I was happy with the result. Then I left it to dry.
- To make the heart a little firmer I adhered it with hot glue to a stiff thin piece of cardboard. In hindsight I would probably do this step before adding the aging glaze.
- Cut out the shape once again. And you now have a sturdier heart on which to adhere the rhinestone chain.


- You could put your finished piece in a shadow box... I happened to use a little wooden drawer that I picked up at a garage sale for $2. I used foam core as a backing and marked it to fit inside.
- Using an exacto knife I cut where I had marked and tested to see that it fit in the drawer.
- Make sure to cut the fabric you will use as a backing a little larger than the foamcore backing.
- Adhere the excess edges to the the back of it with hot glue making sure to stretch it tight to get out all the wrinkles.
- Pop it into place and you are ready to add the heart.


Now to find the perfect place to display it...
Hope you have a wonderful Valentine's day!
Blessings,
Lucy
Make sure to check out more Valentine's ideas by my fellow Junk Visionaries below...
Partying at these locations...


MONDAYS
Something to Talk About @ Spain Hill Farm
Inspire Me Monday @ Sand and Sisal
The Scoop @ Stone Gable
Project Inspire @ Cupcakes and Crinoline
Before and After Linkup @ Thrifty Decor Chick
TUESDAYS
Moonlight and Mason Jars @ Cherished Bliss
Inspire Me Tuesday @ A Stroll Thru Life
Wow Us Wednesdays @ Savvy Southern Style
Talk of the Town @ My Repurposed Life
Dream Create Inspire @ Refresh Living
Swing into Spring @ DIY by Design
What's It Wednesdays @ Ivy And Elephants
WEDNESDAYS
Creative Spark @ Two Purple Couches
Share Your Cup Thursday @ Have a Daily Cup of Mrs. Olson
Home and Garden Thursday @ A Delightsome Life
Share Your Style @ The Vintage Nest
Treasure Hunt Thursday @ From My Front Porch to Yours
THURSDAYS
Brag Worthy Thursday @ Bless'er House
Think and Make Thursdays @ Little Red Brick House
The Creative Circle @ Up to Date Interiors
Vintage Charm @ Charm Bracelet Diva
Shabbilicous Fridays @ The Shabby Art Boutique
Feathered Nest Fridays @ French Country Cottage
Simple and Sweet Fridays @ Rooted In Thyme
The Inspiration Gallery @ craftberry bush
Creativity Unleashed @ Practically Functional
Show and Tell Friday @ My Romantic Home
the weekend retreat @ AKA Design
Inspiration Friday @ The Painted Drawer
FRIDAYS
A morning Cup of Joe @ The Cottage Market
Upcycled Link Party @ Funky Junk Interiors
Inspiration Friday @ The Painted Drawer
Best of the Weekend @ Sweet Pea
SATURDAYS
Saturday Sparks @ Pieced Pastimes
Share it One More Time @ One More Time Events
DIY Sunday Showcase @ The Interior Frugalista
Sundays at Home @ Love of Home
SUNDAYS
Silver Pennies Sundays @ Finding Silver Pennies
Inspired By You @ Reinvented
Inspiration Monday @ What Meegan Makes
Amaze Me Mondays @ Dwellings
Get Your DIY On @ Confessions of a Serial DIYer


Wow what an ingenious way to make your heart ! Think it looks great and love your tutorial too.
ReplyDeleteLucy, what a beautiful daily reminder of God's love for us!! I'm impressed with how you made this from the materials you did!! Very cool!!
ReplyDeleteyou know I love everything about this. I am totally going to look for those trays at the dollar store, what a great material idea!!! I always look for drawers, but haven't hit the jackpot yet...soon I hope!!!
ReplyDeleteLucy you always come up with the cutest ideas ...Very Cute!!!
ReplyDeleteI have never thought about using an aluminum tray in my crafting! Thanks for the inspiration!!! This is a great idea.
ReplyDeleteI have used these trays in the past but have never cut one up - how ingenious. Love your heart and the display - so creative and pretty. Cathy
ReplyDeleteOkay now this is fabulous! I've always wanted an ex-voto heart, too, and yours is creative and just perfect. I don't think that you need another one, this one is great:) xoKathleen
ReplyDeleteTotally loving this project Lucy! It's so lovely, and to think that it started with an aluminum tray. Great idea!
ReplyDeleteLucy, I thought the one your made was the one you were copying! Fabulous! I have to go back and reread. Pinning
ReplyDeleteThat really doesn't look like a disposable aluminum tray. Love the embellishments.
ReplyDeleteLucy this is gorgeous! I love it so much!
ReplyDeleteI think I like your's better than the original, it's precious and I'd never have guessed it was made from an aluminum tray!!
ReplyDeleteI could not believe you started with a dollar store tin plate. Amazing. I'm so inspired!
ReplyDeleteLove this heart. It looks very vintage and lovely.
ReplyDeleteOh my Lucy how clever is this idea! Your Ex Voto Sacred Heart looks so expensive. Pinning to share :)
ReplyDeleteWow, you've really made this look great, I'm never going to look at serving trays the same again.
ReplyDeleteThanks for linking up over at Vintage Charm! xo Kathleen
ReplyDeleteI absolutely love this! One of these antique hearts was on my someday wish list - but I think I might borrow(steal) your idea instead!
ReplyDeleteThat is too lovely for words! I have been eyeing those trays forever, wondering what crafty thing to use them for...this is IT. Thanks for the awesome tute, Lucy!
ReplyDeleteYou're brillant Lucy! Thanks for sharing your lovely tutorial at The Creative Circle.
ReplyDeleteWhat a creative idea! I love your monthly challenges and seeing what everyone comes up with.
ReplyDelete